Pick a fixed shooting spot and mark it, keep the same tripod height, lens or phone zoom, and compass bearing so each visit lines up; shoot a tight blade close‑up, a mid‑distance patch shot, and a wide context view within 10–15 minutes to keep light consistent, note GPS, settings and a reference object, and use low ISO, f/8–f/11 and a tripod for sharp detail. Follow a simple filename and log system so you can compare seasons and learn what changed next.
Some Key Takeaways
- Establish 6–10 fixed camera positions with GPS or flagged stakes to ensure repeatable framing across seasons.
- At each position, record tripod height, lens focal length, compass bearing, and a nearby reference point for precise alignment.
- Capture a six-shot set per visit: close-up blade detail, mid-distance patch, wide context, vertical view, eye-level detail, and 10–15 m overview.
- Shoot within a consistent time window (9–11am) on clear or lightly overcast days, keeping all shots within 10–15 minutes.
- Log date, time, weather, camera settings, soil moisture/pH, recent treatments, and save one keeper phone photo per position.
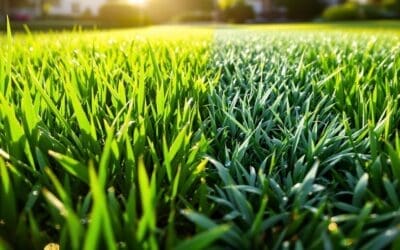
Choose a Consistent Viewpoint and Framing for Seasonal Comparison
Start by picking one fixed spot you’ll return to every season, because consistency is the backbone of any meaningful comparison; mark that location with a GPS point, a flagged stake, or a note like “12 paces from the fencepost,” and commit to shooting from that exact place so foreground rocks, the bridge, and the river line up in every frame. You’ll set the same focal length and orientation, note your lens millimeters or phone zoom, and fix camera height with tripod marks so the mower-stripe perspective and turf blade detail match. Include the same key foreground element and aim the waterline to split it similarly, now capture a wider frame for context and a tighter one for turf texture, and you’ll build a seasonal series that truly compares every season. To track irrigation and rainfall effects on your turf over time, also record precipitation measurements using a rain gauge each time you photograph.
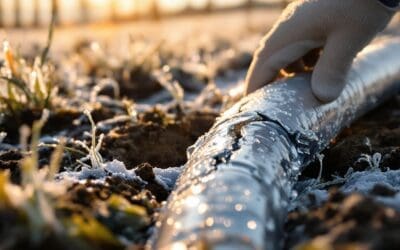
Plan Timing and Weather to Capture Meaningful Winter Changes
When winter arrives and the lawn changes from green to a mix of frost, dull crowns, and patchy moisture, you’ll want to plan your shoots so the images actually tell you what’s happening and why, and the key is timing them to both the season and the weather; aim to photograph within a 2–3 week window after the first hard frost or early snowmelt so you catch peak stress signs like frost-damaged blades, crown discoloration, and mildew without disturbing wet ground, and pick late-morning hours (around 9–11am) on clear or lightly overcast days because the low winter sun will bring out texture without harsh shadows. Now, schedule shoots 24–48 hours after thaw or heavy rain to avoid ruts, include close-ups and one context shot, record exact time of year, recent temperature and precipitation, and repeat visits in similar conditions so your seasonal comparisons actually reveal cause and effect. For homeowners maintaining their turf and landscape, documenting these changes also helps track the effectiveness of winter lawn care practices over time.
Camera Settings and Stabilization to Preserve Low-Contrast Winter Detail
If you want winter lawn photos that actually show the subtle textures and low-contrast details, you’ll need to control noise, depth of field, and vibration from the start, because small blades, frost crystals, and wet sheens vanish in soft focus or grainy shadows. You’ll aim for ISO 100–400 to keep noise down, raise it only when shutter or aperture force you, and pick f/8–f/16 to hold depth of field across blades without diffraction softening. Use 1/30–1/125 s handheld, faster if wind blurs the grass, or go to a tripod for multi-second exposures in still air. This is where a sturdy tripod, remote release or mirror‑lockup, and a beanbag for low angles pay off, and a polarizer cuts sheen—compensate with longer exposure or slight ISO lift for reliable Lawn Maintenance documentation. Consider bringing a reliable soil moisture meter to help record ground conditions alongside your photos, since soil moisture affects frost and sheen appearance.
Compose for Diagnostic Value: Close-Ups, Mid-Distance, and Context Shots
Start with close-up blade detail, getting within about 12–24 inches so individual blades or small patches fill 30–50% of the frame and you can capture spots, lesions, or frass sharply, using a macro or close-focus setting and a ruler or coin for scale. Next step, back up to a mid-distance of roughly 3–6 feet to show the full problem patch and surrounding turf so patterns like striping, patchiness, or spread become obvious and point to issues such as compaction or drainage. Finally, take a context overview from 10–20 feet that includes boundaries, trees, slope, and hardscape, because the key is correlating symptoms with the environment, and when you keep angle and distance consistent over time you’ll make true before-and-after comparisons. Consider also documenting soil conditions with simple tests or amendments to better correlate turf symptoms with underlying soil health.
Close-Up Blade Detail
You’ll want to crouch down and get eye-level with individual blades so you can fill the frame with one to three leaves, because the key is showing the exact edges, spots, and surface texture that tell you whether it’s fungus, insect chewing, or just winter wear. Now close the look by using a macro lens or your phone’s close-focus, focus on a specific blade, and keep shutter speed at least 1/125s or steady the camera on a tripod to avoid wind blur. The key is depth of field enough to reveal edge lesions and surface texture, neutral color balance for true tone, and multiple exposures so you and your crew can compare sharp diagnostic close-ups with wider context later, making shared decisions easier. Also consider testing soil pH with reliable soil pH meters to correlate turf symptoms with underlying soil conditions.
Mid-Distance Problem Framing
When you back up to a mid-distance of about 3–6 feet (roughly 1–2 meters), you’re putting the immediate problem into a diagnostic frame that shows both the symptom and its neighbors, and that’s where you’ll make smarter decisions. Step back to knee–hip height, angle the camera low-to-mid so blade detail and canopy structure remain visible, and center the damaged patch while letting 20–30% of healthy turf and nearby features show for comparison, this is where you’ll clearly see mowing height, thatch and edge effects. Use f/5.6–f/8 or a modest smartphone portrait depth so everything stays sharp, include a ruler or shoe for scale, and shoot within 10–15 minutes of close-ups to keep lighting consistent, then review whether treatments should change the look. Consider documenting the image with the lawn’s recent care history, including any starter fertilizer or seed applications, so you can correlate treatments with changes over time.
Wide Context Overview
You’ve already learned how mid-distance frames reveal the problem and its neighbors, now widen your view so each close-up and mid-shot fits into the lawn’s bigger story; this is where a single context photo (3–10 meters away) pays off, because it shows drainage lines, slope, shade patterns, and nearby hardscape that often explain why damage appears where it does. Now, the key is to combine that context with sharp close-ups and low-angle mid-shots, taken at the best time for lighting, so you connect lesion detail and spread to environmental causes, and you’ll belong to a community of careful observers. This is where you steady the camera, include a scale, avoid heavy edits, and shoot repeat images to track progress. Consider also photographing drainage features and runoff paths to document lawn drainage and understand moisture patterns.
Use Minimal Editing and Consistent Post-Processing for Authentic Comparison
Even if your instincts pull you toward brightening and boosting colors, keep edits minimal so the seasonal story stays honest, and start by fixing only global basics—exposure, contrast, and a touch of clarity—avoiding any saturation or vibrance pushes that would mask true differences between seasons. You’ll treat your lawn care photos like measurements, so use one calibrated monitor and apply a single Lightroom or Photoshop preset across the set, keeping white balance, tone curve, and lens corrections identical, now record exact settings—WB in Kelvin, exposure in stops, highlight/shadow adjustments in percentages—and save them as metadata. Use only non‑destructive local tweaks when needed, log any masks, and export with the same color space, resolution, and sharpening so comparisons remain honest. Also consider documenting application details for turf marking paint used on the lawn to correlate visual changes with specific maintenance treatments.
Create a Shot Checklist and Numbering System for Repeat Visits
Now you’ll set up a simple, repeatable system so your winter lawn photos match from one visit to the next, the key is consistent camera positions and a clear sequential filename that sorts chronologically (for example LocationID_YYYYMMDD_Season_ViewNumber). You’ll create a shot checklist for each visit—wide landscape with the recommended slow shutter for water blur when needed, mid-distance context, close-up detail at f/8–f/11, and a tripod-mounted reference frame at a fixed height—so you never miss the frames that matter. Record precise metadata and a short quality rating in a master log, this makes it fast to reproduce lighting and composition later and to find the best images when you’re comparing seasons.
Consistent Camera Positions
Consistently nailing the same camera positions across winter visits is what turns good photos into a coherent series, so set up a simple, repeatable system now and you’ll save time and get reliable results later. You’ll create a checklist of 6–10 numbered positions, P1–P6, and map them on a sketch or GPS photo so you can come back and match spots precisely; for each position note orientation, focal length or lens, tripod and camera height in cm, and an approximate compass bearing to the main subject. The key is marking a fixed reference point—a rock edge or fence post—and recording distance and direction from it to your tripod center, plus attach one close-up and one wider phone photo per position to confirm alignment in the field.
Sequential File Numbering
Treat your file names like a roadmap, because a clear, repeatable naming and checklist system will let you pick up a shot exactly where you left off last season; start with a consistent prefix that names the site and viewpoint, add a zero-padded sequence (so 001 sorts before 010), and tack on a short season or year code—HolneBridge_HRocks_001_SUM_2024.jpg, for example—so anyone looking at the folder can instantly tell which slot, shot type, and visit it came from. Now we’ll start by reserving fixed sequence ranges for orientations and framing, use 001–012 slots so repeats land in comparable positions, append short metadata tokens like _0.5s or _POL for technical clarity, and keep a CSV checklist mapping filename to date, frame slot, exposure, notes, and star rating so your group can reproduce or re-shoot weak slots reliably.
Essential Shot Checklist
When you set out to make repeatable winter-lawn photos, start by locking down a compact, six-shot checklist and a clear numbering system so you can come back next season and line everything up exactly, no guessing. You’ll number each location with one major unique ID like HB-01, record GPS coordinates and a compass bearing to the focal point, then assign consistent shot codes—HB-01A close-up, HB-01B mid-distance, HB-01C wide-landscape—so your team feels confident and included in the process. Now follow the six frames—low-angle close-up, mid-distance context, wide landscape, vertical of the same view, eye-level blade detail, and 10–15 m context—log camera settings, time, weather, river markers and preferred exposure, and take two orientations, flagging the keeper immediately.
Evaluate, Select, and Arrange Images to Tell a Seasonal Story of Turf Health
For telling a clear seasonal story of turf health, start by thinking like a diagnostician and a visual storyteller at once: you’ll want tight, low-angle close-ups that show individual blades, crowns, and any pests or weeds, plus one or two wider context shots from the same camera position each season so you can see extent, drainage patterns, and nearby influences, and the key is to be consistent with framing and exposure (or bracket and note your settings) so images line up for direct comparison. You’ll rate images by diagnostic value and composition, grouping would normally close diagnostic frames with their landscape counterparts, then pick four images—one per season—ordered chronologically so viewers can read decline and recovery, and caption settings and observations for repeatable, shared learning.
Some Questions Answered
How to Photograph Winter Landscape?
You’ll capture winter landscapes best by embracing low light textures, shooting on overcast days or golden hour, and using ISO 100–400 with f/8–f/16 for depth, now mount a tripod for steady 0.5–1s exposures on flowing water, this is where compositional anchors—rocks, bare branches, bridges—give structure, so frame wide and vertical, stay consistent with camera position across visits, and include close turf details plus context shots for clear comparison.
What to Photograph in Winter?
Photograph dormant textures up close—brown patches, thatch, exposed roots and frost patterns—keeping the camera about a foot or two from blades so diagnostic detail’s sharp. Now include one or two wide shots that show overall lawn condition, low spots, and trees that affect winter stress, this is where drainage and standing water show up. The key is consistent positions and lighting across visits, so seasonal changes become obvious.
How to Photograph Snow Scenes?
You’ll expose carefully, underexposing 0.3–1.0 EV and using low ISO so snow stays bright without blowing highlights, now meter off a neutral midtone or add +1–2 EV with evaluative metering so snow reads white, this is where a polarizer cuts glare and deepens sky, include a reference like a colorful person for a snow portrait and shoot low at golden hour or soft overcast light to show texture, then check your histogram.